Thursday, July 10, 2014

Greenstyle Creations Taylor Shorts for Women PDF Sewing Pattern

Yay!  Its here!  You can now purchase the Taylor Shorts for Women (size 0-18) here!


Previously part of the Womens BundleUP offered by Pattern Revolution, the women's Taylor Shorts are now available as a stand-alone purchase from Greenstyle Creations.  


There are three length options, flat or pleated front, and a contoured waistband.  There is a zippered fly, but no worries, a video tutorial is provided by Greenstyle Creations on their website here. 


This pair of shorts is made with duck fabric . . . isn't it a fun print!
You can find the seahorse print at Hobby Lobby!

I love the comfort of the shorts, and the fact that I can "Taylor" the pattern to fit me using my sewing skills and tailoring knowledge.  Now you can make your own pair of shorts for the summer, in a rainbow of colors and prints to suit your taste!

Since we are all shaped differently (I make a smaller size waistband and take in the back darts a bit more to make my perfect fit), Greenstyle has some helpful guidance for the waistband. If you're a little nervous about making a contoured waistband, watch the video tutorial here.

Here are a couple of pairs I made while testing the pattern.  


I used a lightweight Twill above and a Cotton Duck below.


And here is a seersucker pair for my daughter. . . . you may recognize this pair of shorts . . ..


They are the shorts you see in the piping tutorial on Greenstyle Creations website here.


I often take pictures along the way while testing a pattern . . . it helps the designer see how we understand the directions he/she are drafting; and,  in this case, it helps you if you're looking for some guidance for to add piping to a garment!


LOVE my piping foot!

Get started on your personalized pair of summer shorts!  

I went to Hobby Lobby and grabbed some of that seahorse duck fabric for ME!  

I went shopping wearing my Lille Racerback (Maxi) -- a review of that pattern is here and the pattern can be purchased here.  


Happy Sewing,

gloria june


Wednesday, July 2, 2014

Make your own Mannequin with a PDF Sewing Pattern from Lily Pig Designs

This is a pattern review I provided to Pattern Revolution, posted on their website.  I'm cross-posting here for my readers.  Enjoy!


I'm Gloria Richardson, the blogger behind gloriajune.  I have been dabbling in sewing for more than 30 years, but I have never received proper training in the art of sewing.  I have many self-taught skills, which  may or may not be good (!), but I make myself happy with what I sew, and in the last few years, I've been sewing for our grandchildren and myself.

I have made lots of children's clothing and have just laid them out on the floor or have taken pictures of the garments on hangers.  At one point, I even turned a tomato cage upside down, padded it, and manipulated dresses and whatnot over it just to take a picture.

But not anymore!

I have just made my own Display Mannequin, 
with the PDF tutorial and pattern of the same name, by Lily Pig Designs. 


Don't be scared off by my less-than-perfect stuffing skills!  This Mannequin rocks!  
I made the size 5-6, the perfect size for our oldest grandchildren, a boy and girl. 


Here's the breakdown:

  • A beginner+ can rock this pattern! (one who has used a sewing machine, and is comfortable pinning and sewing lines and easy curves);
  • 5 color-coded pages to print for sizes 6-12 months through 5-6; (also included as a second PDF File are sizes 8 - 14 years);
  • Two pattern pieces to cut out;
  • Options for displaying the mannequin for dresses and/or pants; (I used both casing options on my mannequin because they are separate from each other and do not disturb each other in placement.)
  • Woven fabrics are best for the beginner (an experienced sewist may get creative with burlap, decor fabrics, etc.).  I do not recommend a lightweight broadcloth--I used it for my mannequin and I would prefer a heavier weighted cotton that would withstand the stuffing phase.  I'm not good at stuffing!    
  • Depending on your skill level, it can take up to an hour (stuffing the mannequin may take time if you are a perfectionist or wanting to achieve the best look to display clothing for sale).

The designer is from the Netherlands, so you will find that her word choices are different than what we use in the United States.  You will see phrases like "stick the pieces together," which I know means to piece together or to lay on top of each other.  And, "turn out the right way," which I know means right side out. You can figure out the word choices!

The Fabric Requirements are given in centimeters.  You can easily access a measurement converter on the internet to convert to inches if necessary.  Round up is the rule of thumb!

There is no mention of how much polyfill or stuffing to buy -- it will vary upon the size you make.  I bought 20 ounces for my Size 5-6 Mannequin and used only 1/4 or so of the bag.

The directions are clear and pictures are included along the way.  Suggestions and photos for poles/stands are provided.  My husband used scraps from our wood collection.

I added a logo with my embroidery machine.  I think that would be great for those of you who wish to display your garments for sale!


This is where I chose to embroider a logo.  I don't sell clothes, but thought this may work for those of you who do!

A shirt for my grandson!

A dress for my granddaughter!

You can get closeups of details easily with the mannequin!

You'll be happy with this pattern!  I am glad I finally made one!   You can buy a copy of the pattern from Lily Pig Designs here.  Use code "review" for 20% off your purchase price!

Happy Sewing!

gloria june


Friday, June 27, 2014

One more . . . My favorite bundleUP item is the SPRING LILY from Ellie Inspired!

I just couldn't end showing you what I made for the bundleUP.  I have to show you one of the garments I tested.  

The Spring Lily is my FAVORITE garment from the bundleUP.  Its smart and stylish! And -- yes, its true -- EASY to construct!  

There are four pattern pieces (sleeve is optional, so I used only 3 pieces), and measurements for your skirt piece.  

Princess seams make up the front bodice -- its simply sewing two pieces together that are sort of on the concave.  You just shape the pieces together as you sew.  Don't be scared!  If you need a little more encouragement, Craftsy has a little help for you here.

The skirt is completed by making box pleats.  Don't be afraid of that either, it is much simpler than you think!  I'm not a pinner, so you can imagine watching me fold my pleats as I sew . . . probably not a good thing to watch because you are already scared, so I'll let you watch a little video here to help you get started.  
You can also pin and iron as you go, to help hold the box pleats. And then stay stitch to hold them in place before you attach to your bodice.  


The arrow points to the marks I made to guide me while making the box pleats.  I took this picture during the testing process to show the new kids on the block one way to do the pleats.  I did my pleats at the machine as I sewed.  I know, that probably makes you squeamish.  I am lazy and that was a quick way to get 'er done!


I used my lining piece as my muslin.  I have a much smaller waist (I am built like a woman, not a rectangle!) so I knew that I would have to take in the waist area, as I do with everything I sew.  


This is my lining, used as the muslin in the testing of the Spring Lily.  I was halfway there since I used the lining as a fit guide!  When I started sewing my fashion fabric, I knew exactly where I needed to increase my seam allowances or how much/less deeper to make my darts.  

I have a mannequin!  Do you?  I love to use it for projects like this! I usually put my favorite bra on the mannequin to make sure everything hits where I want it to . . . 


And it does!

No one was supposed to ever see these photos . . . they were taken during testing.  

My daughter removed the mirrors from the guest bath and put them in her room.  

Here comes Mommy!!!!!


The Spring Lily does have a zipper in the back.  The instructions are clear and pictures help along the way. . . come on, you put a zipper in your Taylor shorts, didn't you?


The design of the Lily shows my curves wonderfully.  


I'm ready for photos now!
  
Had to wear the pearls for this!


What in the heck can I do with my arms so that I don't create wrinkles
because my arms are funky . . . .
I sew, I'm not a photographer!

Mad Men -esque?


Now, these were taken well after testing and when I got my new camera!  


Please step out of your little girl panties and into the wonderfully magical world of self-care sewing and add the Spring Lily to your BundleUP!

Happy Sewing y'all,

gloria june


A quick video on box pleats . . . .

I will be guest posting at Ellie Inspired about my fabulous Spring Lily from the bundleUP.  Here's a short video on how to measure & pin box pleats . . . .

You'll love the results!


Happy Sewing!

gloria june

Thursday, June 26, 2014

Violette Fields Piper is playing my song

My last contribution to the Pattern Revolution BundleUP-Women tour is my vision of the Violette Fields Piper Misses.  You probably can't take this vision home to mama.   My take on the Piper is what I will call a bit risque.  Magical sewing mistress that I am.

I was pleasantly surprised by the full pattern pieces and at least one sewing skill this old broad doesn't see unless I dig into my paper pattern collection  -- a dart.  in the bodice even.  

This is both a scary but also exciting post in that I was teasing earlier today about whether or not I could "bring sexy back" to the women out there like me -- too close to 50 to not admit it.   I'll take the risk.  Why not?  


I am pleasantly surprised by this pattern.  It reminded me of the paper patterns I love to cut out while watching "Everybody Loves Raymond".  

Its a lot of cutting.  I don't mind at all.  I LOVE paper patterns. Tissue paper is much easier to ball up and put in the plastic grocery bag hanging off my glass on the side table though.  


What I did not like was the printing of 45 pages (black ink only), then cutting & positioning and then taping and then cutting out the pattern pieces.  

Don't get me wrong, it was worth it -- I love this pattern.  But with a paper pattern, at least I only have to cut once.  


I use a tracing wheel and tracing paper --- old fashioned maybe,
but it always gets the job done for me!


Something I've rarely come across since making PDF patterns -- a dart. I was surprised.  Perhaps the PDF pattern revolution will not block out all traditional sewing standards and practices in place -- sneaking the kind of sewing I know into your skill set secretly.   


So, here it is.  

I remembered the sheer blue & white polka dot fabric I found at a Hancock Fabrics "spot the bolt" sale last year (I bought oodles of it at $1 a yard).  Perfect.  

No need for a bow.  This dress and old broad doesn't need it.  

I feel seductive and silly at the same time.  

Success.  My emotions and hormones are cycling in chaos.  

Ergo, age appropriate behavior.    (giggles)


You can still #bundleup.  
The sale ends at midnight June 27, 2014.
Shop here.


Happy Sewing,

gloria june

Monday, June 23, 2014

PJ's are in the Women's BundleUP!

Suzanne Winter, of Winter Wears, has released her first PDF Sewing Pattern and it's just for you!  AND, its a freebie until June 27, 2014 if you BundleUP!

Parisian Nights PJs

Comfort is the goal in these pajamas.  Suzanne designed these for use with light knits and stretch lace.  So for those of you who are drooling over the lightweight knits at Girl Charlee, this is the pattern for you to finally take the plunge and order those fabrics under 7 ounces!

Here's the sizing information so you can start adding to your cart!


When these pjs came up for testing, I was already in Walmart picking up some odds and ends.  I was strolling past the men's department when I noticed the files were ready for download.  The Tshirt fabric isn't lightweight and slinky, but it will work for a test garment . . . . 

Let's grab a couple of men's t-shirts and see what happens!  

Now for the pictorial  . . . . . 


I love my ruffler foot.  I use it to gather everything.  It makes a beautiful finished look.


There is decorative stitching using a variegated (multi-colored) thread across the top of the bodice and on the hems of the shorts, but my daughter stole my pjs and she's on a mini vacay.  :(

No need to remake.  The test PJs are perfect for us!


I used Tshirts for this test because I had the idea that, for those of you who have husbands that collect Tshirts and they need to be upcycled or thrown away, here's one way to catch his eye with his favorite sports team or rock band displayed on your pj's!  Cut out panels from the usable parts of the Tshirt if its closer to time to throw them away and he will notice you've saved something for him!  

These are comfy y'all.  You'll love having an option to make your own PJs!


Happy Sewing,

gloria june


Sunday, June 22, 2014

I've got the Skinny on Jocole Patterns in the BundleUP!


The Pattern Revolution BundleUP for Women Blog Tour Continues!  The sale continues through June 27, 2014!  If you haven't made a decision yet, look over the patterns available here.


Today's look at the BundleUP is Jocole Patterns.  Two patterns are included!


Take a look at all of Jodi's PDF Patterns available here:  JOCOLE


A Couple of Pictures first . . . .


Jocole Peplum Top, modified sleeves, Elbow Length


Jocole Skinny Pant, Front Pockets, Capri length

Jocole Peplum Top

Honestly, when the buzz started a year or so ago about "Peplum" this and that, I had no idea what everyone was talking about.  I am a flip-flop, tennis skort, cami top styling girl that tills a garden, cleans my pool, mows "the back 40," entertainer of chickens, dogs and cats kind of girl.  I know nothing of style.  Just comfortable clothes that get me through each day.  

Then I realized my niece Katie mentioned something about never having found a peplum top that she really liked.  Yeah, a chance to try a peplum and find out what the fuss is all about.

Tshirt with a twist is what it is!


This top is a fitted knit t-shirt with a peplum at the natural waist and includes six (6) sleeve options.  After printing 15 pages with a smidge of colored ink use (the jocole logo), you will have 6 pattern pieces, one is optional to change the look of the back peplum.  Instructions are very detailed and every possible tip is included either directly in the pattern instruction or via a link provided to Jodi's extensive tips & tricks located at her website here.  

I finished my shirt in 30 minutes: from print & tape, cut & fabric to the serger.  (I've been sewing for 30+ years, and its not often I find a pattern I can sew together without looking at the instructions -- I'm in love with Jocole!)  If you take longer, no worries, we all sew at different levels!  I know I cried many times over the last 30 years struggling to learn to sew!  
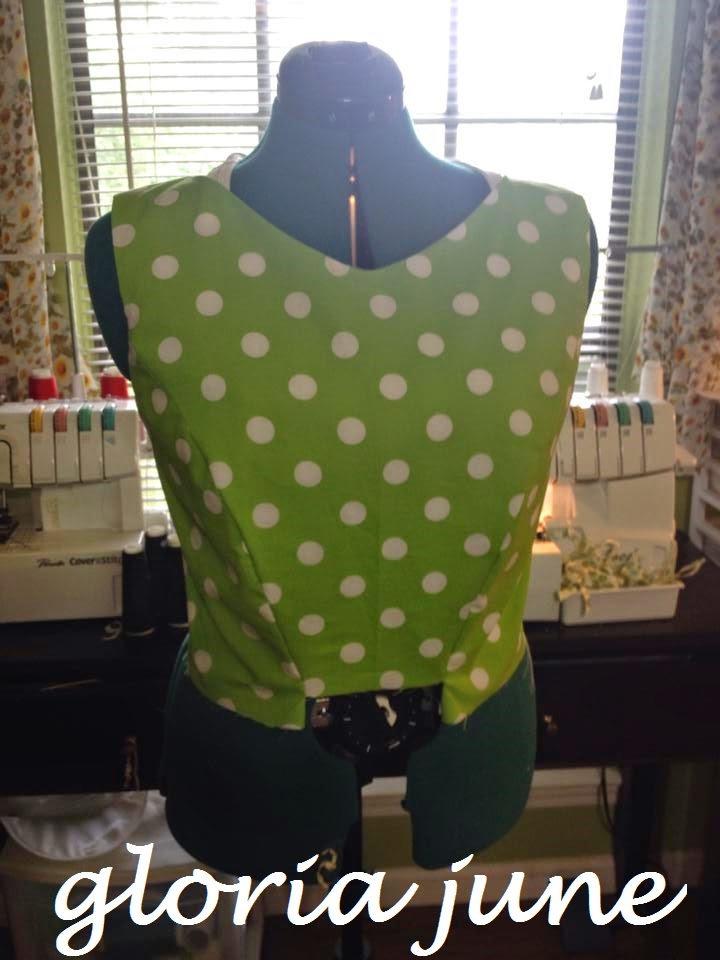
My Peplum Top

I decided I wanted to make it one size larger, for layering. 

AND I wanted split sleeves.  

Glad I tried this!  I love the look.  

And I love the sweater knit I found on a clearance table at Hancock Fabrics a couple months ago.  #hoarder


I simply cut the sleeves in the largest size, split each sleeve in two pieces at the fold, overlapped the top and bottom of the sleeve to fit my armscye, stay-stitched, then set them in following the instructions.

Try it! You can figure this one out!

I wonder if Katie will like this!


Jocole Skinny Pants

Girls, how many pairs of pants do you have that, if you lay them out on the floor, look like a rectangle?  Are you shaped like a rectangle?  No, we all have a bit of a curve, whether or not you realize it!  


Fiddled with a decorative stitch on my sewing machine.  I'm liking that special touch!
Jodi has designed the essential easy-on, comfy knit waistband (the comfort of yoga pants plus the style of  skinny pants) one stop bottoms pattern.  I say bottoms because there are seven (shout it!) length options:  shorts, bermuda, clam digger, capri, petite, regular, tall.  And options for front and/or back pockets.  Yep.
I know.  You are amazed.  Jodi Jean Baird is amazing.  

My Skinnys


I found a woven in my stash that had the same leaf style as the sweater knit I used for my Peplum Top.  #lovemyfabrichoard!!!  And I had a lycra knit that I was saving for a bikini, so I knew I would be able to snip off a bit for my yoga waistband and still have enough left for future plans with that fabric.

And yes, another 30 minute garment completion time.  I did not have to look at her instructions, yet again.  (Of course I did look at the instructions -- you may not have been sewing as long as I have and you might wonder if everything you need to know to make these pants & top are there for you -- IT IS!!!!)
21 color coded pages to print, 2 pattern pieces for the pant, 2 optional pattern pieces for the pocket choices.  One measurement guide to cut your yoga waistband.  

For me, a perfect fit.  I do not have to go to another clothing store for bottoms.  Ever.  


(Fishtail Peplum Option)


My Recommendation


Because Jocole Patterns are filled with everything you need --  detailed instructions, photos/diagrams, links to extensive tips & tricks from Jodi on her blog, cutting lines for lengthening/shortening; and Jodi Jean Baird has created a community for discussion and help on Facebook; and, the devoted, helpful Jocole fans sharing their experience with Jocole patterns, as well as their personal sewing experience/expertise . . . (I need to take a deep breath here because that is a LOT y'all!) 

. . . you should definitely Bundle both Jocole Patterns offered in this sale.  

Then, go directly to her shop and buy some more!  


Happy Self-Care Sewing,

gloria june

PS:  Did I tell you I love Jodi Jean Baird?  She works hard for you honey!  Give her some of your money! And you'll get back so much more!